
In this article I will show you how I built a 3D printed holder to upgrade my wooden Stirling engine kit.
Click here for the full article!
I got this Stirling motor set from banggood.com and it costs about 15$. Use this link if you want to take a look! The video above will show you how to assemble the wooden Stirling engine set.
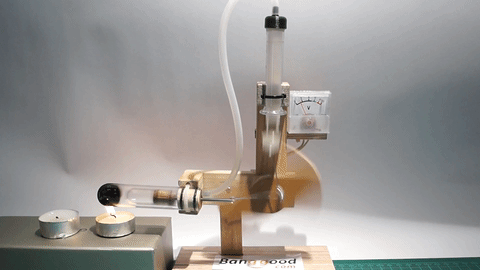
The stirling motor’s main components are silicone tubing, a glass syringe acting as cooling tube and a glass cylinder acting as disperser tube. The silicone tube connects both and thus enables air exchange between the heated disperser and the cooling glass syringe.


The baseplate and main holder are partially preassembled and are easily set up using the washer and nut included in the kit.


The flywheel is press fitted onto a small DC motor’s axis. The motor works as a generator and a small voltage meter on the top right shows its output voltage.

Now since I wanted to improve the engine’s looks, I decided to design a new holder and base plate to be 3D printed later using my Anet A8 3D printer. I sketched up a main holder and flywheel in CAD software and sliced them in Cura for 3D printing.


I had to seperate the main holder into two parts for printing since as a whole it would have taken too long in one print. I just sliced it in half and added holes for screws so I was able to put them together afterwards.


As a baseplate I chose a transparent acrylic sheet with metal screws as feet. The main mount get’s bolted onto the baseplate.

Now I had to reinstall the disperser tube, cooling tube and flywheel. I chose a small ball bearing for the flyhweel and printed a fitting adapter.

I also added a 3D printed adapter to the glass syringe to connect to the flywheels piston rods.

Here’s a picture of the finished motor:

Simply place a heatsource beneath the disperser and give the flywheel a push after half a minute and the motor starts running on its own!

If you’re interested in the plans simply write me an e-mail and I will send them to you! You could also watch the whole design and assembly process in this video:
Here are more detailed pictures of the Stirling engine for your viewing pleasure.


Here are more detailed pictures of the Stirling engine for your viewing pleasure.


http://www.doityourselfgadgets.com